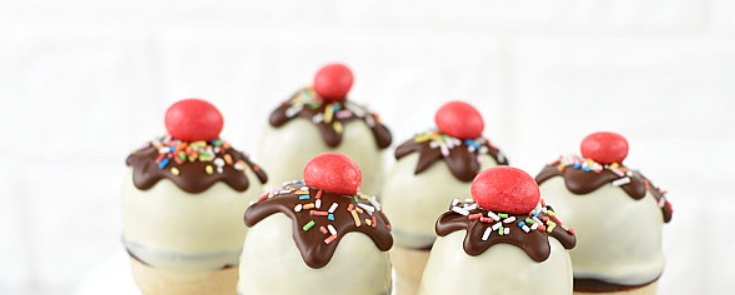
Bite-sized cake balls in ice cream cones, adorned with chocolate and sugar sprinkles. These warm-weather treats are perfect for children’s parties. They look beautiful and captivate children’s attention. They are small, colorful, and not overly sweet. When making cake pops with cocoa cake, I used only cream cheese, so the balls aren’t too sweet, and the chocolate on top complements them perfectly.
Ingredients:
- 400 g of any sponge cake
- 200 g of cream cheese, like mascarpone
- About 20 ice cream cones
- About 150 g of white chocolate
- About 50 g of dark chocolate
- Colorful sugar sprinkles
- Colored candy-coated chocolates with nuts inside, e.g., M&M’s
- 2 teaspoons of rapeseed oil
Preparation:
- Crumble the cake thoroughly by hand. Add the cream cheese and knead. (The mixture should not crumble or stick to your hands).
- Form the mixture into balls of a size that fits the ice cream cone. (Form a ball and place it on the cone. Part of the ball should be hidden in the cone, and the rest should protrude upwards. I made exactly 19 balls with a diameter of about 4 cm). Place the balls on a baking sheet lined with parchment paper.
- Chill the board with the balls for about 15 minutes (or longer) in the refrigerator.
- Optionally, place a few colored candies at the bottom of each cone. (For mini cones, use 2-3 candies).
- Finely chop the white chocolate and melt it with a teaspoon of oil in a double boiler.
- Dip the chilled cake balls halfway into the melted white chocolate, wait for the excess chocolate to drip back into the bowl, and place them on the cone, chocolate side down. (This will adhere the balls to the cone). Chill in the refrigerator for 15 minutes (or longer) until the chocolate sets.
- Reheat the white chocolate slightly until it is fluid again. Holding the cone, dip the balls into the chocolate, rotate the cone to ensure the chocolate covers the ball well, wait for the excess chocolate to drip back into the bowl, flip the cone, and return it to the refrigerator to set.
- Once the white chocolate has set, finely chop the dark chocolate and melt it with a teaspoon of oil in a double boiler. Using a teaspoon, make a drizzle of dark chocolate on top of each ball, allowing the chocolate to slightly run down the sides, assisting with the spoon. (This will create a chocolate glaze on the ice creams).
- Immediately sprinkle with sugar sprinkles and place a red candy in the center as a cherry ;). (You can also use other colors).
- Leave the finished ice creams to set the chocolate. They taste best when chilled, straight from the refrigerator.